Dec. 1st, 2007 04:00 pm
Banner Tutorial 14 out of 25
^_^ 1st December post... Who still reads these?
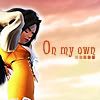
Go from this to this: .
.
CREDIT TO:![[livejournal.com profile]](https://www.dreamwidth.org/img/external/lj-userinfo.gif) devils_sucubus for the icon.
devils_sucubus for the icon.
THIS IS NOT MY ICON. If the creator has a problem with me using their icon, please contact me! :)
So you'll end up with all the following information: (copied from![[livejournal.com profile]](https://www.dreamwidth.org/img/external/lj-community.gif) custom_banners)
custom_banners)
icon:
http://i44.photobucket.com/albums/f1/xoamortentiaox/Tutorials/Tutorial%2024/00.jpg
series/character: dunno... think she's from final fantasy....
placement: Mod's Choice
icontest community: mog_awards
week number: 55
theme: Sky
link to winning post: (.... my laziness)
lj name you want on banner:devils_sucubus
font used: Fairydust
brush credits: n/a
file format: any
Additional comments? none.
THIS TYPE OF BANNER MAKING IS GOOD FOR: Banners you feel like doing a bit of manipping.... -_-' I dont suggest using it that often unless you have too.
Go from this to this:
 .
.CREDIT TO:
THIS IS NOT MY ICON. If the creator has a problem with me using their icon, please contact me! :)
So you'll end up with all the following information: (copied from
icon:
http://i44.photobucket.com/albums/f1/xoamortentiaox/Tutorials/Tutorial%2024/00.jpg
series/character: dunno... think she's from final fantasy....
placement: Mod's Choice
icontest community: mog_awards
week number: 55
theme: Sky
link to winning post: (.... my laziness)
lj name you want on banner:
font used: Fairydust
brush credits: n/a
file format: any
Additional comments? none.
 |
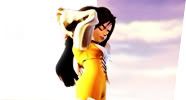
We start them all off with the icon copy and pasted to a 300x100 canvas. ^^ Align this one to the right so we can make the sky the background for the icon. |
 |
I found this image (the original image wasn't cut up). I used the sky and maniped the background. |
 |
Then I used Image>Ajustments>Variations to color the background an orangish color. (use Midtones and click the respective colors until they look right.) |
 |
Next duplicate the icon. Horizontally flip the dulicated icon and align it to the right side of your original icon. Use a blurred circle eraser in order to lightly erase the part with teh character on it. It allows for blending between icon and banner. |
 |
Now use that picture that we had back up in part 2 and align the girl on the right side. Use only the part that "didnt appear" in the icon. Under that picture's layer, make a white border around the girl like they did in the original icon. |
|
Add text and you're done! |
THIS TYPE OF BANNER MAKING IS GOOD FOR: Banners you feel like doing a bit of manipping.... -_-' I dont suggest using it that often unless you have too.
no subject
I used a sky texture and applied the variations and blurred eraser steps and it turned out pretty good. The extension of the wall or whatever it is in the icon I used a kind of wood texture and then applied the angled strokes filter, and used the line tool for the top part, but I couldn't quite get it to match the way the sky does. The main problem is I can't continue that object in the bottom left of the icon. I think this would be a better opportunity to just try to search for the image on google to solve that, but I wanted to try manipulating textures. Anyway I ended up just using a lazy solution of a drop shadow because it didn't match exactly.
without drop shadow
I'm wondering what your solution to that whole bottom corner would have been :)
no subject
However, as to my solution to the bottom corner. I would have added a small amount of red [color copied from the original icon] and placed it on screen about 50% [just so it's barely noticeable in the background. On top of that layer I would have croped that part of the roof under the tiny text next to sesshoumaru [sp?] and horizontally flipped it. Then I would use a blurred circle eraser in order to erase around the edges so it would match. For the top of the roof.... I would crop the area above the tiny text and flip it until it matches the direction of the roof. [of course this layer is under the tiny text]. Then I would blur the edges again with the eraser. ;D
With any luck I came out to something like: