Apr. 7th, 2007 11:57 pm
Tutorial 001: Mokona - The Emperor
This is my first tutorial so bear with me ;)
Made with Photoshop 8.0 >> Beginner friendly
Thanks to the tutorials made by![[livejournal.com profile]](https://www.dreamwidth.org/img/external/lj-userinfo.gif) wicked_enough where I learned some of the techniques I use here ^_^
wicked_enough where I learned some of the techniques I use here ^_^
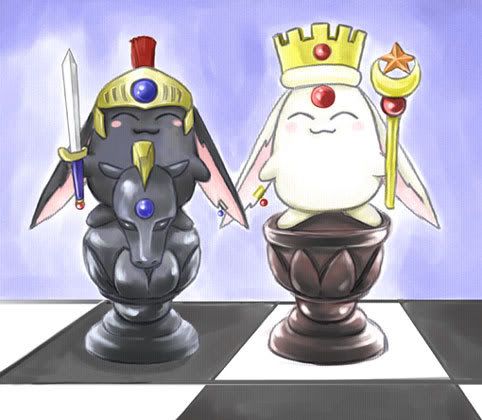
Were going from this to in 8 easy steps!
Step 1!
Crop a base from 94x94 pixels like so:
Step 2!
Duplicate the layer and use the filter sharpen >> sharpen. Put the layer on 50% or how it looks best on your image.
It should look something like this:
step 3!
Duplicate the 1st layer once more and put the layer on top. Then use filter blur >> Gaussian blur. Set the layer to overlay @ 25% or how it looks best on your image.
Like this:
Step 4!
Then I used this texture bygraphicdump and set it to Hue @ 100%. I erased the red jewels on the crown, staff, Mokonas head and the earring.
It should look like this:
Step 5!
Next I used this light texture byianthinae. I set it on screen @ 100%.
Like so:
Step 6!
It text time! I rotated the icon 90 degrees CW. (Image >> rotate canvas >> 90 CW). Then I typed the words The Emperor in font Old English text MT, 12pt, color:#675A6F.
Dont forget to rotate the icon back!
You get this:
Step 7!
Open a new document in white @ 100x100 pixels. Then copy the icon onto the new document. (select >> all, edit >> copy merged, select the new document and then edit >> paste)
Like so:
Step 8!
Finally add this brush bywicked_enough onto the icon in the same color as your text.
Result:
Feedback is welcome!
And excuse my crappy English!
Made with Photoshop 8.0 >> Beginner friendly
Thanks to the tutorials made by
Were going from this to
Step 1!
Crop a base from 94x94 pixels like so:
Step 2!
Duplicate the layer and use the filter sharpen >> sharpen. Put the layer on 50% or how it looks best on your image.
It should look something like this:
step 3!
Duplicate the 1st layer once more and put the layer on top. Then use filter blur >> Gaussian blur. Set the layer to overlay @ 25% or how it looks best on your image.
Like this:
Step 4!
Then I used this texture by
It should look like this:
Step 5!
Next I used this light texture by
Like so:
Step 6!
It text time! I rotated the icon 90 degrees CW. (Image >> rotate canvas >> 90 CW). Then I typed the words The Emperor in font Old English text MT, 12pt, color:#675A6F.
Dont forget to rotate the icon back!
You get this:
Step 7!
Open a new document in white @ 100x100 pixels. Then copy the icon onto the new document. (select >> all, edit >> copy merged, select the new document and then edit >> paste)
Like so:
Step 8!
Finally add this brush by
Result:
Feedback is welcome!
And excuse my crappy English!
Tags: